Pictures As Speakers and Heroes
A picture speaks a thousands words. This is true when you are in the internet business. Pictures have been used very extensively on many websites to communicate beyond where words can go.
A very popular trend in many modern websites is to use a large image called ‘hero image’ overlaid text at the top of the page; especially the home page.
This gives your users a lasting impression of your message and increases the chances of user engagement since the image can describe exactly what you are communicating better than heaps of words.
Posts and articles can also benefit from the good in pictures when Featured images are used well. This gives your readers a more visual and lasting impression of your content.
Warning! : Am a talkative……
The Challenge.
What if like the hero image; you want to overlay your post title on your post featured image? Or in simple terms make your featured image the background of your post title positioned above your main post content?
GeneratePress can already set your featured image as the header of on top of your page or post content. Awesome! Yet I needed even more I wanted the post title to be overlaid on top of featured image. Going through the GeneratePress support forum I saw this was a feature that has been requested by some users but not very easy to implement.
The Goal
Like the image above, our goal is to get the post title and post Meta on top on the post content (be the header) and make the post featured image the background of the post title. Let’s call this the featured header.
We also want the Author Gravatar and Url below the featured header. Let’s call this one the avatar header (What the heck is wrong with my naming skills?).
GeneratePress Theme.
GeneratePress is an awesome newbie and developer friendly theme developed by Tom Usbome. It’s Light weight (under 1mb zipped) and very fast. GeneratePress has lots of customization options, many hooks and even better is the GP Premium add-on.
The premium add-on is a steal comparing its price to feature. Overall Tom is a great developer, super responsive and very client friendly, a family guy and great dad…..(ok am going too far here). Thanks for looking through the code Tom!
Let’s Get To Work
Yep. It’s been a long intro so let’s get to work.
Wait! Some Requirements First!
- GeneratePress Theme– Of course; although this will work with any theme too. Get GeneratePress theme from here.
- Access to your server– To upload/create some files. If you don’t have FTPS access, worry not, there’s a trick to get around it!
- GeneratePress child theme is installed and activated – If you don’t have a GeneratePress child theme Get it from here.
- A gravatar. This is optional. The author image can be pulled in from their Gravatar account. It’s time to get one if you don’t. Click here for a Gravatar account.
- Skill Level – Intermediate. If you can access ftp, copy-paste code in functions.php and you can do basic CSS edits you will be fine.
Does it work on Premium or just Free version? It works with both free version and paid add-on.
#Note – Am using GeneratePress with little to no custom theme customization.
Now Let’s Start.
I won’t pester you with the WordPress theme hierarchy and how themes work. Coming this far I believe you are at least a bit familiar with this part of WordPress.
We are will be using two WordPress theme template parts. Don’t worry. They are already baked and ready to serve.
Give me the code already!!!!
Ok, Grab All the code snippets you need here.
Its broken into four parts. Two theme template parts, a php code file and a CSS file (with a weird name).
- featured-header.php (Theme template part).
- avatar-header.php (This is a theme template part)
- functions.php (php snippets )
- featured-image-title-overlay.css (CSS)
See the all code below:
Code for ‘featured-header.php’
Code for ‘avatar-header.php’
Code for ‘functions.php’
CSS styles for ‘featured-image-title-overlay.css’
[Brace yourself! Long Scroll down!]
The Implementation: In 4 (four) Simple steps:
#Warning! Don’t do this on a live site.
Try on a dev site, staging site or local server first! Always Remember to do a full backup of your site if you intend to do major changes to your site.
We will go through just four simple steps (if not over simplified).
- Download the all the code here.
- Upload featured-header.php and avatar-header.php into your child theme folder.
- Copy the code in the functions.php file and paste it in your theme functions.php or any plugin you use for custom php code.
- Copy the CSS and paste it in your child theme style.css file. You can tweak it to your preference.
Step By Step –The Tutorial (long) Method
Step 1 – Download all the code snippets.
Click here to download. I have uploaded all the code on Github.
It will come as a zip file with long weird name. Extract the zip file.
Step 2 – Upload Theme Template Parts
Upload featured-header.php and avatar-header.php into your theme folder, preferably your Generatepress child theme folder. Great, if you got past this stage skip to step 3!
# If NO FTPS access
If you don’t have FTPS access to your server or too simply lazy to log into the server like me follow the steps below to upload the files.
Install WP Editor plugin
Install WP Editor from the WordPress plugin repository. It’s a code editor that replaces the default theme/plugin editor with a syntax highlighting editor and also allows uploading of files to your WordPress Install. It’s a gem.
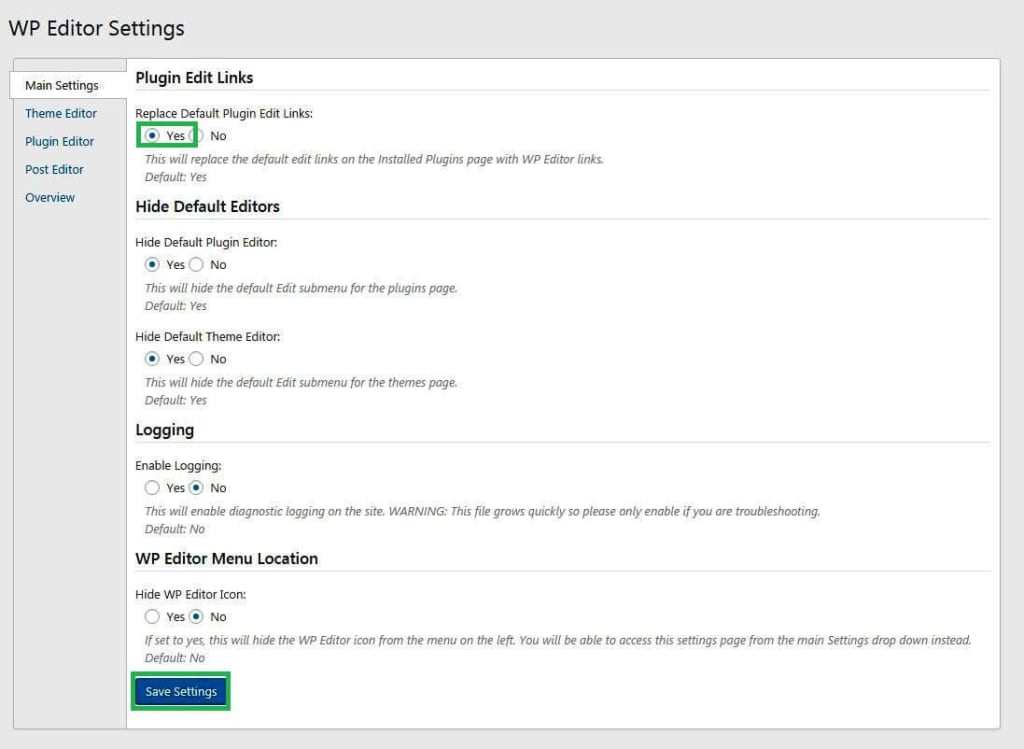
WP Editor settings
Once installed go to plugins page, locate WP Editor on plugins admin page and click settings. Or simply find the WP Editor on the admin dashboard, it’s has a pencil icon.

On the WP Editor settings page click main settings and make sure ‘Replace Default Plugin Edit Links:’ is toggled to yes and click save setting.
In your wordpress admin Go to ‘Appearance’ > ‘Theme Editor’. A cool code Editor welcomes you. Notice the blue upload file button at the right? Yeah, that’s what we were after all this while.
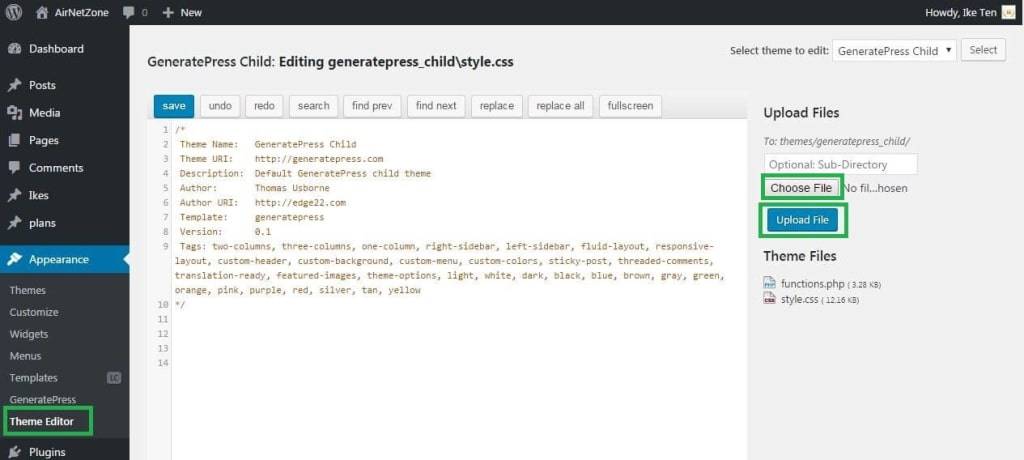
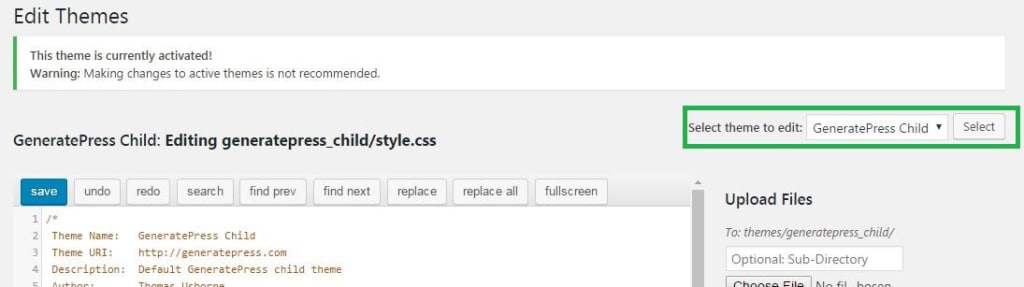
Select your child theme
Click on the ‘select theme’ drop down located on the top right corner and select your child theme, now click the ‘select button’ and wait till it loads your child theme into the editor.
Upload Theme Template Files
After your child theme is loaded into the editor. You will see the files present and listed under ‘Theme Files’ are the ‘functions.php’ and ‘style.css’ (am assuming you don’t have any custom templates already).
Step To upload files:
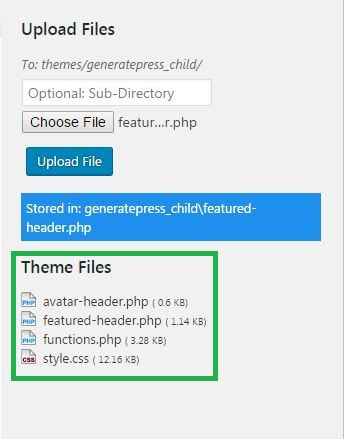
– Click the ‘Choose File’ button located above ‘Upload File’ button at the right.
– A select file path window will pop, browse to where you extracted the code-snippet.
– Select avatar-header.php, after selecting, click upload file. A success message will be displayed after it is successfully uploaded.
– Now repeat the above to upload featured-header.php.

– Everything should look like the image below when we are done uploading.
Great! We are making progress. You have completed two (2) steps and just two (2) more to go!
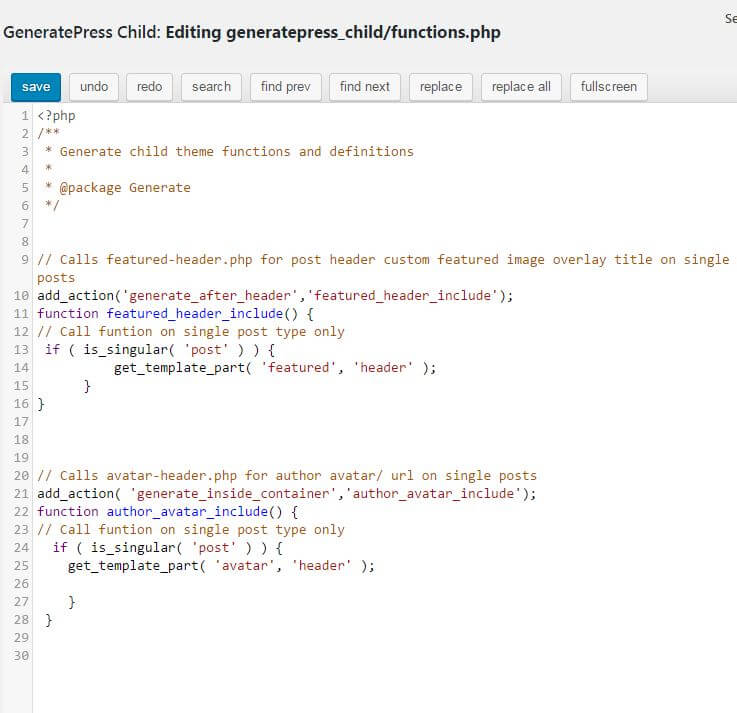
Step 3 – Paste php code in functions.php
Copy all the code snippets in the ‘functions.php’ and paste it in your theme functions.php or any plugin you use for your custom php code. Get the code here.
Everything should look like below . Note that am using the WP Editor hence the syntax highlighting.
Break Time!
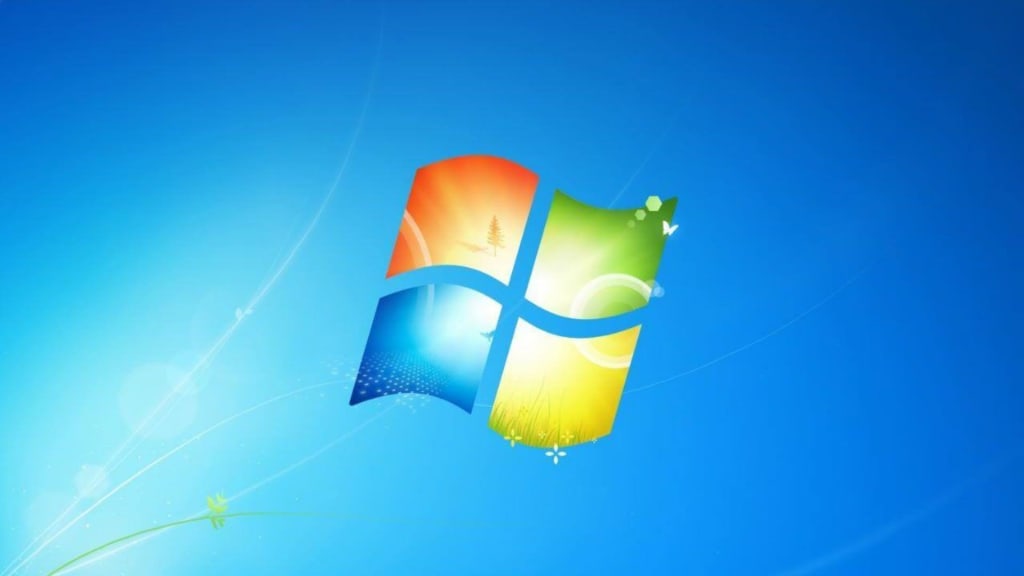
Before we more on to step four, make sure you have published a post with a big enough featured image. Something around 1000px width and 550px height is good.
Remember it’s more like hero image so yes it’s huge. Am using the Windows 7 default screen saver image.
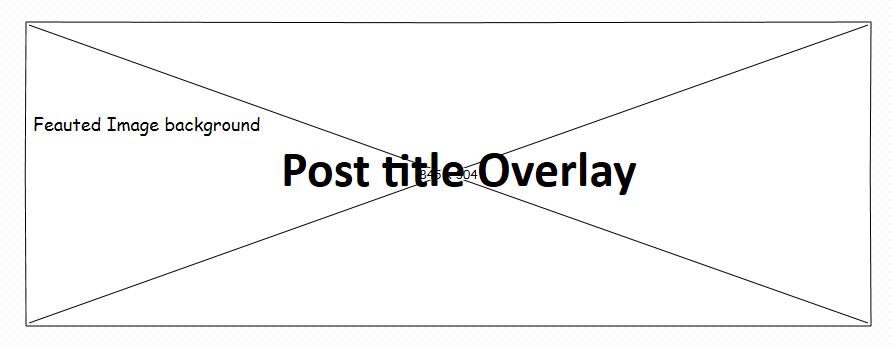
Now go to the post and view it. It does not look great, does it? Its just plain, has no styling and everything is thrown all over the place, only your Gravatar is showing great at this point.
Even your prominent featured image is nowhere to be found! It looks something like this. Let’s solve this in step four (4)
Step 4 –Style it out!
Copy all the CSS code in featured-image-title-overlay.css and paste it in your style.css or any plugin you use for custom CSS. I recommend Simple CSS from Tom the author of GeneratePress theme. It has a live preview in the WordPress Customizer.
Done!
It all comes together
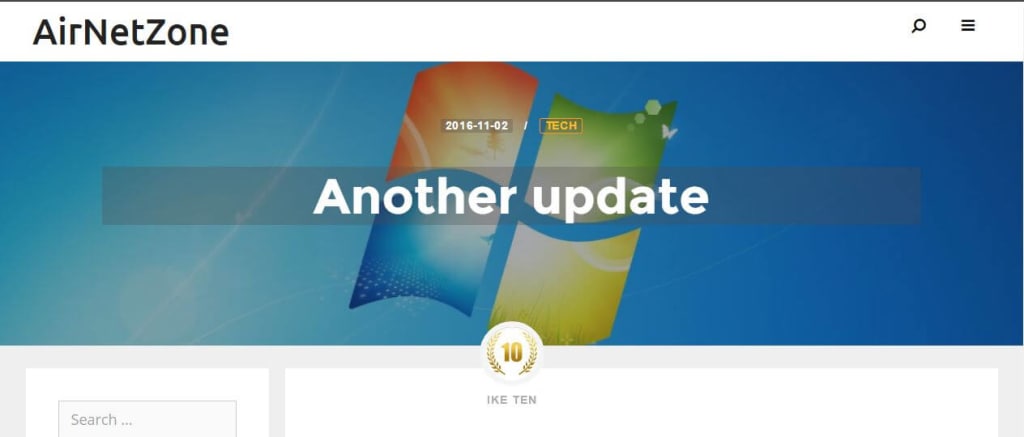
Now reload your post again. Tadaa!
Everything should look good now. At least most things are displaying well. The featured background Image is visible with the post title overlaid on top of it. The Post Meta is displaying nicely with some cool hover effects.
The title has a light-dark background to make it more legible.
And oh!, look at the author Gravatar, positioned nicely in the middle. The author ulr works too!
Bonus: Everything this is responsive and will look nice on desktop and mobile too.
Over to you. U can style and tweak the CSS to your heart’s content.
Congrats! Now you should have the featured image of the post displayed as a background image of your post title.
Hey Wait! What’s happening here?
Explaining the code
There are four chunks of code here; featured-header.php, avatar-header.php, functions.php and featured-image-title-overlay.css.
Featured-header.php and Avatar-header.php are theme templates. Functions.php and featured-image-title-overlay.css are just code snippets. Their relationship is plain simple explained below;
1. Featured-header.php
The featured-header.php calls the post featured image as the post header background. It pulls in the post Meta (post modified date and the post category).
Then it finally grabs the post title. All these are pulled into and wrapped in one div with id of “entry-header-wrap” and class of “entry-header-wrap”.
#Note – It must be uploaded into your theme folder and preferably the child theme folder.
2. Avatar-header.php
The Avatar-header.php is even simpler. It just grabs the author’s avatar image linked to author’s email on gravatar.com or the local server.
It also pulls in the author’s url and echo’s them out. Avatar-header.php must be in uploaded or created in your theme folder and preferably the child theme folder
3. Functions.php
#Note – The code here should not be uploaded or created in the theme folder. Just copy and paste it into your functions.php or any plugin you use for your customs php snippets.
There are two functions to put in your child theme functions; feature_header_include and author_avatar_include. (Yeah I have a bad naming taste!)
– the feature_header_include function
The first function, feature_header_include just checks if we on a single ‘post’ post type. If this condition is true it pulls in the featured-header.php and hooks it into the generate_after_header hook.
Ok this means that we first check if we are on a single blog post, if true, we pull the featured-header.php template part into the single post through a hook or location in GeneratePress called the generate_after_header. View hooks as locations in the theme and it will make more sense.
Yes it means exactly what it says we place the featured-header after the GeneratePress post header.
– the author_avatar_include function
The second function, author_avatar_include also checks if we on a single ‘post’ post type. If this condition is true it pulls in the avatar-header.php and hooks it into the generate_after_header hook.
This also means that we first check if we are on a single blog post, if true, we pull the avatar-header.php template part into the single post through a hook in generate press called the generate_inside_container. Meaning we put the avatar-header inside the content container.
#Note – We specify a condition to check if we are on a single post of the ‘post’ post type before we hook the featured header and avatar-header. This prevents them from loading site wide on all posts of all other post types which is unpleasant.
4. Featured-image-title-overlay.css
This is all the CSS to make the Featured header and avatar header positioned and styled well. Copy all the CSS and paste it into your style.css or any plugin you use for custom CSS.
Tweak the CSS. You will spend much time here tweaking the style to suit your theme.
Other Relevant Customization Notes:
– To Disable default content featured Image
If you want to show only your new featured image title header (yeah bad naming taste indeed), you can disable your generate press default featured image and title; or simple hide it with CSS. You may want to save space for other content or just suit website aesthetics.
-More locations
You can experiment with different locations using the GeneratePress hooks.
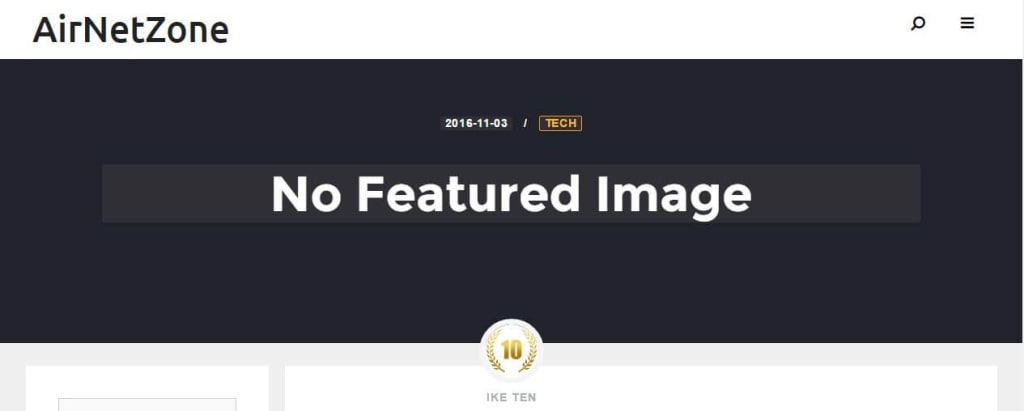
– What if there is no Featured Image?
In case there is no featured image present nothing weird will happen or break, you rather get an awesome dark background that makes your post title more prominent like below.
– Website Speed
Yes of course. We are now demanding a few extra queries so do well to optimize your site for speed. There is a good post by Tom Usbome for Optimizing GeneratePress here.
-Feed back
I am happy to hear your feedback.
– I wish to improve the code or even a do better implementation.
– I welcome improvements or suggestions to better the code or tutorial, do share it in the comments.
– Also comment below if you have questions or challenges.
-Sorry The rest of the site is on maintenance mode.
Thanks for visiting.
Enjoy!
I have been surfing on-line more than 3 hours, but I never found anything close to this. Off to create my featured background image. Thanks.
Thanks for the awesome feedback. I was inspired to write this after digging through the internet too. There are lots of helpful content but just a bit difficult to find especially for unique cases like this. I hope this fills in the gap and helps people interested in “full width background featured images with post title overlay”.
Hi. I tried this but the title and post meta was also showing below the hero overlay. I had to manually remove the post meta content from content-single.php in a child theme since CSS wouldn’t cut it.